


Installation Instructions - Single Front Door
GENERAL INSTALLATION INSTRUCTIONS
This guide is for general assistance. We always recommend hiring a professional trim carpenter for your door installation to ensure ideal fit and preformance.
Buildings that are very air and water tight can experince negative air pressure which can pull moisture into the building.These guidelines are created to eliminate water leaks in your building. The installer and building owner is responsible for reading and understanding these guidelines to prevent prematures failures which are not covered under warranty by Glenivew Doors. Always provide a copy of these instructions for the current building owner.
INSTALLATION TOOLS:
- Hammer
- Wood shims
- Cordless Drill with Bits
- Exterior Silicone
- Levels, 72” and 24”
- Safety glasses
- Measuring Tape
- Water Resistant Foam Insulation
- Putty Knife
- Rags / Paper Towel
- 3” Finishing screw
- Weather Resistance Barrier
- Construction Adhesive
- Flashing
- Utility Knife
- Safety Glasses
- Cutting Shears (Sill Plan)
- Construction Stapler
- Screwdrivers
- Nail Set
- Pencil
- Step Ladder
- 3” Flat head Phillips Wood Screw
Step 1
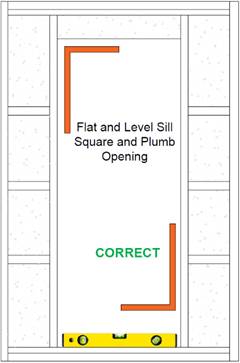
Rough Opening Preparation:
Determinine prior to installation what the actual finish floor height will be and adjust the rough opening (Existing wall opening at the Field) if needed.
- Ideal Rough Opening should be 1 ½ inch wider than actual Unit Size (Net Outside Frame Size) and ¾ inch taller.
- For typical wood frame construction it is also essential that the wall sheathing be a solid surface to ensure that the unit can be secured firmly to the wall.
- Rough openig should be square within a tolerance of ¼”.
- The floor must be level with a tolorance of 1/8”.
- The header must be supported by trimmer studs
- Minimum double studs should be used at all wood frame rough opening


- The exterior face of the rough opening must be in a single plane with less than 1/8” twist from corner to corner.
- The rough opening sill must not be crowned or sagged
- Check the bottom surface of the opening to ensure it is flat, level, and free from debris. Proper operation of the door requieres a sill that is flat and level
- Important: If these conditions are not met, the installer must take corrective actions to alter the opening(s) before proceeding
Step 2
Installing Door Frame
- Make sure the door is supported so it does not swing open during installation.
- Apply a generous amount of Exterior Grade Silicone on the subfloor where threshold will sit. This prevent drafts and moisture from penetrating through the bottom. Use entire tube when caulking along the sub floor.
- Lean the prehung door into the rough opening.
- Use 3” screws on the hinge side to temporarily hold the unit in position. One screw near the top and one screw near the bottom. Do not tighten.
- To secure, insert one shim at each of the following locations of the frame.
- Top corner (hinge side, pictured below)
- Top corner (strike-plate side, pictured below)
- Bottom corner (hinge side)
- Bottom corner (strike-plate-side)
- Behind each hinge (hinge side)
- Moirror hinge-shims on the strike-plate side.
- Behind the strike plate (strike-plate side)
- When the shims are properly installed, there shouldn’t be any movement or twisting.
- View the gap around the door unit from the interior side, it should be even all the way around. If it’s not, adjust with shims. Make sure the unit remains square.
Step 3
Adjusting the Door
- Verify the door unit is square.
- To fasten, tighten the two screws installed earlier.
- Test door to make sure the door closes tightly against wheather stripping.
- To secure the frame on the hinge side, replace two hinge screws with 3” wood screws on each hinge.
- To Secure the frame on the lock side, drive in several 3” finishing screws. For the best apperance, tuck them behind the wheather stripping so they are not visable after installation.
- Important: Drive screw through shims and into the wall stud for maximum strength and stability.

- Be sure the door opens freely and that the space between the door and the jamb is even on all sides.
- Adjust the threshold with a Phillips screw driver. Use the screws to lift or lower the wooden raiser until there is even clearence on the bottom of the door.
- Insulate the space around the door by applying High Grade Water Resistant Insulation Foam between frame and rough opening.
- Apply Jamb Extension if needed
- Finish installtion by applying brickmould to the exterior side of the door. Apply sealant to the back side of the brickmould before fastening with finishing nails.
- Minimize the appearance of finishing nails with touch-up kit
- Caulk around the doorway including the front sill edge and along the exterior where it meets the brick or siding